Archive for May 9, 2012

Pi and Arduino

You’ve probably seen Dr. Monk’s blog on using Pi and Arduino, but what if you don’t have the Arduino software installed on a nearby computer?  (Or, like me, you are just perverse and want to make something work only using the RasPi.)

I had a quick look at getting the Arduino IDE running on the Pi, but that’s likely to be effort because the Arduino page specifically states you must use Sun’s version of Java or it won’t compile.  That’s an issue because Sun (now Oracle) haven’t made a version of Java for the Pi (so far).

So, time to learn how to program an Arduino without using the IDE.  These instructions basically worked first time for me, except I had an issue with actually programming the Arduino which turned out to be because the USB hub I was using to provide power was only giving around 4.5v to the Pi – which is out of spec.  (Aside: That may well be what caused the problem with the Sandisk Cruzer USB flash drive – I can’t tell if it works now because the drive has gone permanently write protected, which is a bit annoying)

Note these instructions are for the Arduino Uno.

In summary you need to install the AVR toolchain:

sudo apt-get install gcc-avr avr-libc avrdude

Create your program for the Arduino, say as blink.c (source heavily based on the above link):

#include <avr/io.h>
#include <util/delay.h>
#define BLINK_DELAY_MS 500
int main (void)
{
  /* set pin 5 of PORTB for output*/
  DDRB |= _BV(DDB5);
  while(1) {
    /* set pin 5 high to turn led on */
    PORTB |= _BV(PORTB5);
    _delay_ms(BLINK_DELAY_MS);
    /* set pin 5 low to turn led off */
    PORTB &= ~_BV(PORTB5);
    _delay_ms(BLINK_DELAY_MS);
  }
  return 0;
}

Now I created a short shell script “program.sh” to compile and program the board, it takes the C file to compile as an argument, e.g. ./program.sh blink.c

#!/bin/bash
if [ -z $1 ]; then
 echo "Usage $0 <source.c>"
 exit
fi
FILE=$(echo $1 | sed 's/\..*//')
rm $FILE.o $FILE.elf $FILE.hex
avr-gcc -Os -DF_CPU=16000000UL -mmcu=atmega328p -c -o $FILE.o $1
avr-gcc -mmcu=atmega328p $FILE.o -o $FILE.elf
avr-objcopy -O ihex -R .eeprom $FILE.elf $FILE.hex
avrdude -c arduino -p ATMEGA328P -P /dev/ttyACM0 -b 115200 -U flash:w:$FILE.hex

Run that over your C file and you should see output as your Arduino is programmed, and then the LED on the Arduino starts to flash.

Source in easy to pull form is over on github.
First slice of Raspberry Pi

My RaspberryPi arrived yesterday! I’ve been anticipating it for so long I almost wasn’t expecting it, despite the dispatch note from Farnell on Friday.

I spent a while yesterday struggling to get it booting, due to an SD card it didn’t like. This is apparently a firmware issue the Raspberry Pi foundation are aware of and are hoping to resolve, but at the moment, especially as there are so few Pis around, it’s a bit of a lottery whether you have a good card or not. The particular Class 4 SDHC SanDisk card I had was no good, but an older 8 GB SanDisk card from my camera worked fine.

Once it came to life the HDMI output to my TV worked straight away.  I haven’t tried it with my LCD display yet.  I had a quick play in X – Midori wouldn’t run enough of the main twitter site, but was good enough to tweet from the mobile version.  I then enabled sshd and so it can run headless, this was simply a case of renaming a boot.rc file in /boot, can’t give the exact command because I don’t remember the original file name, but it was obvious.

I was a bit disappointed that my 16GB Sandisk Cruzer Blade USB stick didn’t work – dmesg showed various kernel errors when I first plugged it in.  Second time (in the other USB port, though don’t know if that really made the difference) it came up and I could mount it, but when I tried writing to it I got some DMA errors from the kernel and it went read-only.  I haven’t done any Linux kernel debugging before, but I suspect here might be where I start!

Today, I thought I’d give the GPIO a quick test – after all, that was one of the things that got me most excited about the Pi in the first place.

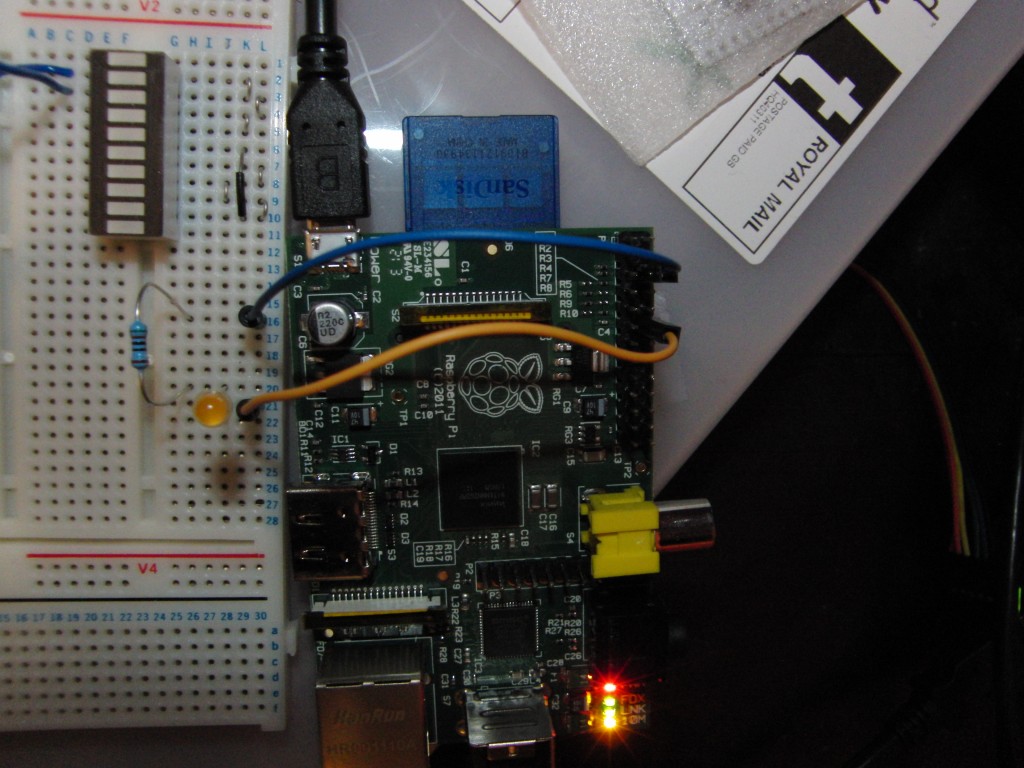
Note, there is no protection on the GPIO so you should proceed with caution.  I set up a simple LED with an over the top 510 ohm resistor to ensure I wasn’t going to draw too much current from the GPIO:

I’m using GPIO 18, which is 6 from the top on the right hand row, and its connected to ground (3rd from the top on the same row) via a yellow LED and the aforementioned resistor.

You can make it blink straight from the shell:

pi@raspberrypi:/dev$ sudo bash
root@raspberrypi:/dev# echo "18" > /sys/class/gpio/export
root@raspberrypi:/dev# echo "out" > /sys/class/gpio/gpio18/direction
root@raspberrypi:/dev# echo "1" > /sys/class/gpio/gpio18/value
root@raspberrypi:/dev# echo "0" > /sys/class/gpio/gpio18/value
root@raspberrypi:/dev# while ((1)); do echo "1"; sleep 0.2; echo "0"; sleep 0.2; done > /sys/class/gpio/gpio18/value
^C
root@raspberrypi:/dev# echo "0" > /sys/class/gpio/gpio18/value
root@raspberrypi:/dev# echo "18" > /sys/class/gpio/unexport

The video shows it blinking on and off: